
#1 Why We Need to Stitch Photos?
Do you need to stitch photos in Windows? Stitching photos oftentimes becomes a really needful task! And, there are multiple reasons behind it. For example, if you want to produce an extremely high resolution photo, then stitching is absolutely needed. That’s because — it allows you to combine photos at once. Similarly, photos that need to cover a wider angle of view also require photo stitcher software. The reason is — this work is not possible with a single lens.
Thus, you have understood the need for using a photo stitcher software. When it comes to stitching photos, you can’t simply rely on the standard Paint or Photoshop software. That’s because — both of these tools are quite difficult to use. Especially, if you are a beginner, you are most likely to observe loads of problems and difficulties while using these tools.
As an alternative to this, you are recommended to use a photo stitcher in windows. In the below sections, you will reveal the key details of this potential software.
#2 Introduction of Photo Stitcher for Windows
This is one of the best and most recommended Photo Stitching apps for you. You can easily download the tool on your Windows machine simply by navigating to this link — https://vertexshare.com/photo-stitcher-desktop/. There are two key features of this excellent tool.
First of all, it allows you to combine multiple photos. Secondly, it allows you to create a panorama photo. There are some other benefits too. For example, you can use this software to make a long screenshot of a conversation. In addition to it, the tool extends some other facilities as well. To be more precise, you can also use this tool to insert annotation and watermark on your stitched photos.
Thus, it seems to be a one-in-all software that is integrated with photo combining and photo editing features into it.
#3 How to Use a Photo Stitcher for Windows? (Step by Step Guidance)
This Photo Stitcher for Windows is extremely easy to use. For your reference, here’s the step-by-step guide that you can refer to.
First of all, you will need to download the software by visiting the link given — http://vertexshare.com/download/photo-stitcher/PhotoStitcher-forWin.exe.
Now, you should complete the installation process. Once the tool is installed, please open it and it will launch the tool interface.
You can now add the desired images to the tool. For this purpose, you can either click on the Add button or use Drag & drop options.
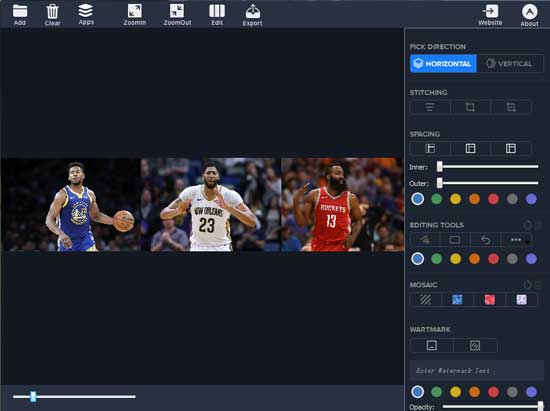
Once your required images are added to the photo stitcher tool, you should now make appropriate edits. Note, there are many editing options available. For example, you can change the order of images before combining them. You will need to choose whether the images will be stitched vertically or horizontally. You may add borders outside or inside of the images as well.
Plus, there are many photo editing options. You can use some of the basic drawing tools that include rectangles, arrows, and freeform drawing. What’s more, it even allows you to add a watermark and even modify the text opacity, color, spacing or size.
Once you’re done with all of these changes, you are now ready to Export the final image. Isn’t it? If yes, then you can easily export the image by clicking on the “Export” button from the menu strip. It will ask you the location where you want to save the image. Please select the desired location and your image will be saved.
#4 Benefits of using Photo Stitcher for Windows
- It’s easy to use.
- It allows for easy ways to combine photos.
- It can be used in Windows.
- You can combine either vertically or horizontally using it.
- It has optional photo editing options like adding annotation, Watermark.
The Final Verdict
With this, you have revealed an excellent tool that can be used to combine photos. Please feel free to download the tool today by visiting its official link. You can then install the software and use it for stitching photos. There are different types of customization options available.
For example, you can change the order orientation of images, add watermarks and annotation, and much more too. Please feel free to take advantage of these features and stitch photos hassle-freely.